Drop Down MenusCSS Drop Down MenuPure CSS Dropdown Menu
Showing posts with label Windows-Others. Show all posts

Saturday 24 September 2016

How To Change RDP (Remote Desktop) Default Port on Windows Server 2008 R2

Change RDP (Remote Desktop) 3389 Port on Windows Server 2008 R2


-- Remote Desktop Protocol (RDP) stands for Administrative Console Access. If your System has Remote Desktop enabled, it is listening for TCP connections on Port 3389 (by default Port) and it may be necessary to make it even more secure by changing the TCP Port used for the network access. Since this port is both well known and can be used to attack accounts. If you want to change the port, it requires a quick change in the Windows registry.

Note: Editing the registry is very risky, So be sure you have a verified backup before saving any changes.

Step: 1. Open Registry Editor :

Click on Start -> Run -> Type: regedit -> Press 'OK'.

Step: 2. Change Registry :

Go to:

HKEY_LOCAL_MACHINE\System\CurrentControlSet\Control\TerminalServer\WinStations\RDP-Tcp\PortNumber

Double Click on PortNumber -> Select Decimal -> Give Value Data (2289) -> OK

Step: 3. Allow your Port Number within Windows 2008 Firewall :

Click on Start -> Administrative Tools -> Windows Firewall with Advanced Security -> Inbound Rules -> Search Remote Desktop (TCP-In) & Right Click -> Disable Rule.

-- Then Create a New Rule for RDP :

Inbound Rules -> New Rule -> Select Port -> Next -> Specific Local Ports (2289) -> Next -> Next -> Next -> Give Name (RDP) -> Finish -> Close.

Step: 4. Restart Remote Desktop Service (plus Dependent Services) :

Click on Start -> Administrative Tools -> Services -> Restart the following Services :

-- Remote Desktop Configuration
-- Remote Desktop Services
-- UserMode Port Redirector

Step: 5. Finally Restart the Server :

Now Login with new Port Number.

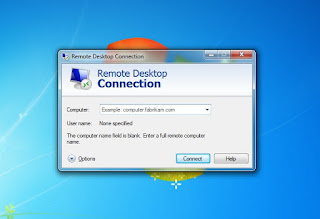
Note: When you try to Connect to this Computer by using the Remote Desktop Connection, you must Type the new Port Number.

Ex: 192.168.100.102:2289

Thanks For Visiting on My Blog, For More Tutorials Keep Visiting My Blog
Friday 19 August 2016

How To Create a Wireless Hosted Network in Windows 10

Wireless Hosted Network

-- Hosted Network is a feature that comes included with the Netsh (Network Shell) command-line utility. It's was previously introduced in Windows 7, and it allows you to use the operating system to create a virtual wireless adapter.

This method does not require you to Download any third-party Application. You can easily set up a Wi-Fi hotspot using the built-in tools in Windows.

Step: 1. Open Command Prompt with Administrator Privileges :

How To Create a Wireless Hosted Network in Windows 10


Step: 2. Check if your Wireless Adapter Supports Hosted Networks in Windows 10 :

Type the below Command :

C:\WINDOWS\system32> netsh wlan show drivers

How To Create a Wireless Hosted Network in Windows 10
Step: 3. Create a Wireless Hosted Network :

Type the below Command :

C:\WINDOWS\system32> netsh wlan set hostednetwork mode=allow ssid=MySSID key=Passw0rd
C:\WINDOWS\system32> netsh wlan start hostednetwork

How To Create a Wireless Hosted Network in Windows 10


Step: 4. Share your Internet Connection with a Hosted Network :

-- Right Click on "Network Adapter"
-- Click on "Open Network and Sharing Center"

How To Create a Wireless Hosted Network in Windows 10

Note: In Network Connections, you should see a new Microsoft Hosted Virtual Adapter which is labeled Local Area Connection* X.

How To Create a Wireless Hosted Network in Windows 10

-- Right Click on "Ethernet" 
-- Click on "Properties"

How To Create a Wireless Hosted Network in Windows 10

-- Click the "Sharing" tab

-- Check "Allow other Network users to Connect through this Computer's Internet 
    Connection" option.

-- Next, from the "Home Networking Connection" drop-down menu select the "Microsoft 
    Hosted Virtual Adapter".

-- Click "OK" to Finish.
 
How To Create a Wireless Hosted Network in Windows 10
 
Now, You’ll have a brand new Wi-Fi Network that’s connected to your home internet.

How To Create a Wireless Hosted Network in Windows 10
Step: 5. Now Connect Any Wireless Capable Device to the newly Created Access Point :

How To Create a Wireless Hosted Network in Windows 10


Thanks For Visiting on My Blog, For More Tutorials Keep Visiting My Blog
 

Saturday 13 February 2016

How to Install .NET Framework 3.5 on Windows Server 2012 and Windows Server 2012 R2


How to Install .NET Framework 3.5 on Windows Server 2012 and Windows Server 2012 R2


Step: 1. Command Line :

-- Insert the Windows Sever 2012 installation media.
-- Open Command Prompt as Administrator.
-- Execute the following command:

C:\Windows\system32> dism /Online /Enable-Feature /FeatureName:NetFX3 /All /Source:D:\Sources\SxS\ /LimitAccess

Step: 2. GUI Mode :

-- Insert the Windows Sever 2012 installation media.
-- Open Server Manager.
-- On the Add Roles and Features wizard, click on "Specify an alternate source path".
-- Enter D:\Sources\SxS\ to point to the Server 2012.
-- Click OK.


Note: Once done installing through the GUI or command prompt, if you navigate back to the Add Roles and Features Wizard, you should see the feature has been successfully installed now.

Thanks For Visiting on My Blog, For More Tutorials Keep Visiting My Blog

Copyright © 2016 Kousik Chatterjee's Blog